Pages

Friday, December 30, 2011

Someone's in the kitchen with Dinah

Or maybe it's just me.  In the kitchen with me.  Whichever way it is, I have been doing some serious baking, cooking, and candy making over the last two weeks.  However, one thing that has been made slightly more than anything else is seasoned pecans.  My parents have four pecan trees that have been quite generous with their production over the last couple of years.  My mother finally got tired of trying to keep up with the shelling and took them to be cracked.  Believe me, when you're not dealing with paper shells, that's exactly what you want to do!  Mom and Dad were kind enough to give us a large paper bag filled with cracked (but not shelled) pecans, so Mr. Awesome and I (well, mostly Mr. Awesome) have been sitting on the couch at night watching the first season on The Andy Griffith Show and getting those things ready to eat.  I don't really have enough space in the freezer right now to store the cracked pecans (which could go rancid if left out), so I have been making yummy treats with them instead.  


This recipe comes from the 1953 Better Homes and Gardens New Cook Book.  Please try to hold back your shock when I tell you I changed it.  I have the original recipe typed "normally" and what I did in italics.  


Crisp Sugared Walnuts (the title alone should clue you in to some changes)

Place 2 1/2 cups walnut halves in a shallow pan and roast in oven at 375 for 15 minutes.  Stir frequently.  Take out of oven.  I used 4 cups pecans in place of the walnuts and my big stoneware bar pan.

Cook 1 cup sugar, 1/2 cup water, 1 tsp cinnamon, 1 tsp salt to 236 without stirring.  I did this for a couple of batches, but you can also leave out the cinnamon and put in a total of 2 1/2 tsps of salt for sweet and salty nuts.  They are equally delicious.

Remove from heat.  Stir in 1 1/2 tsps vanilla and nuts until nuts are well coated in syrup.  I actually did this.  Kinda.  I have no idea how much vanilla I used.

Spread nuts out onto a greased platter.  Leave until cool.  I spread mine out on foil instead, which worked really well.  

These turned out great every time I made them and were liked by all.  I'm actually going to make two more batches today.  I'll have to time it to see how long they last...

And who could stay out of the kitchen when they have this new, incredibly adorable oven mitt?  Thanks so much Anita!!

Thursday, December 29, 2011

Let's take a break

...from our regularly scheduled program to look at this adorable face:


You may now continue on with your day.

Wednesday, December 28, 2011

And for next year...

We've been quite busy this year decorating and remodeling our first house.  I thought I'd share with you a list of things we would still like to do...room by room.  Now, please do keep in mind that we are NOT planning on doing all of this in 2012.  Just the few little things in bold:

Den:
Paint fireplace
Paint the walls
Add trim under the mantel
Get a larger mirror for above the fireplace
Bamboo shades for all three windows
Get nicer switch plates
New flooring
Get a wood burning insert for fireplace

Kitchen:
Paint walls
Put up a backsplash
Paint cabinets
New switch plates
New dishwasher
New light fixture
New stove
New fridge
New sink light

Great Room:
Paint
Install board and batten
Install quarter round
New switch plates
Living room rug
Coffee table
Two end tables
Two lamps
Get an arm chair
Bamboo shades for all windows
New front door
New curtains
Picture frames
New dining room light fixture
Dining room rug
Baby grand piano (hey, a girl can dream)
New dining set
Built-in cabinets in dining room

Back Hall:
Install quarter round
Paint
New light fixture
New switch plate


Little Man's Room:
Paint
Install quarter round
Closet system
Rug
New switch plates


Master Bedroom:
Closet system
Rug
New switch plates
Curtains/rods
New light fixture
Chest of drawers
Dresser
New mattress set

Office:
Install quarter round
Paint
Rug
New light fixture
New switch plates


Guest Bath:
Convert fuse boxes to breaker and move to utility room (give us about 5 years on this one)
Install shower

Front Porch:
Get a porch swing
Get a bench
Enclose
Remove Carpet

Over-zealous?  Perhaps.  Over-whelming?  Not really.  Oh, how I do love a list!  It helps keep me on track to get everything accomplished while letting me know exactly where I am.  And this way, all of you can join with me in watching everything get crossed off.  Here's to a busy, but lovely, 2012.

Tuesday, December 27, 2011

For the Big Boy


He has decided he's big enough to sit in a big boy chair at the table.


Someone got a big boy bed, too.  He's not using it yet, but it won't be much longer.

Sunday, December 25, 2011

Merry Christmas

"Glory to God in the highest, and on earth, peace, goodwill toward men."
Luke 2:14


Friday, December 23, 2011

Being Thrifty

Yesterday, I mentioned the sweaters from Goodwill that I bought for stocking making.  I'm sure you can tell quite easily from the pictures in that post that I didn't use every bit of both sweaters.  As a matter of fact, there was a good bit of "scrap" left over.  I'm pretty sure you know where this is going.  I saved all of the remaining fabric, and yesterday morning I took the cut off sleeves, stitched them into straight tubes (rather than tapered tubes) and wound up with these:


Boot socks!  The Tall Charming One got me these awesome boots for Christmas (and then couldn't wait that long to give them to me), and I have been wearing them nearly every day.  Over at Pinterest, I have a very large board dedicated to styles that I like, and I have a few outfits pinned with boots and boot socks.  I could have gone here or here and spent nearly $20 on a pair, but instead, I chose to be thrifty and use what I had.  Two sweaters+5 minutes = two (nearly free) pairs of what are essentially leg warmers.


I even left all of the junk in the background here so you can see exactly what our den looks like about  61% of the time.  Just trying to keep it real for ya.  

I had a great time this week trying to see how little I could spend and yet still produce quality work from online inspiration.  It's not difficult at all, and I encourage you to try it, too.  I even have some ideas in the works for what's left of the sweaters.

Thursday, December 22, 2011

It Only Took Six Years

Every year at Christmas, there's always one thing that's missing in the Chadwick household.  Stockings.  That are hung by the chimney with care.  And until this year, the chimney part was missing, too.  I have a slight aversion to buying anything that I can make for myself, and, honestly, there's not much out that that I can't make for myself.  That aversion even holds true for Christmas stockings.  I have always really liked the look of cable knit stockings.  They look like the socks that people would have used years ago.  However, the thought of knitting them kind of made me want to cut my nails too short so I couldn't.  So instead of torturing myself, I went to Goodwill, bought two sweaters for about $4, and did this instead:

 I took one large sheet of heavy paper from a very tall person's artist pad.

 Free-handed the stocking.

 Ummm, changed it up a bit.

 Cut it out.

 Changed it up a bit more.

 Pinned the stocking on the inside out sweater.

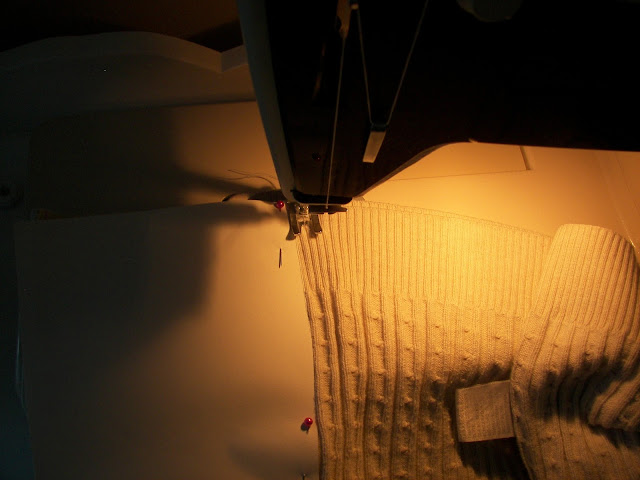
 Stitched around the pattern using a zigzag stitch and the edge of the paper as a stitching guide.  
To be perfectly honest, I just couldn't quite wrap my head around how the pattern should look including the seam allowance, and I figured it would be easier to stitch the stockings first without cutting the pieces out anyway.

 Cut out the stocking.

 Turned right-side out.

 Did this three more times.


 Cut red ribbon to appropriate length. 

 Took a really bad picture of a small cup hook that I put in the wall above the mantle.  

 Hung stockings with care.


I went ahead and did four stockings so there would be one for any future little Chadwick child.  Right now, it's the dog's.  For this project, I think a sweater that is either 100% cotton or wool works best.  The fabric isn't as stretchy, and that will give you a nicer looking end result.  The cup-hook-in-the-wall is a trick I picked up from my dad.  They will just stay put year round, waiting patiently for each Christmas to roll around so they can bear the weight of stockings stuffed with sweet little presents.   Some future Christmas may find me decorating them and embroidering our names on them, but for this year, I like them just the way they are - plain and simple.